Le basi
- Prima Pagina / Strona Glowna / Home page
- Chi sono / O mnie / About me
- Tutorials
- Premi / Osiagniecia / .....
- Torte Varie / Torty Rozne / Different Cakes
- Torte per Bambini / Torty dla Dzieci / Cakes for Children
- Torte Clasiche / Torty Klasyczne / Classic Cakes
- Dolcetti / Babeczki / Cupcakes
- Biscotti / Ciasteczka / Cookies
- Decorazioni per le torte / Ozdoby na torty / Cake toppers
- Fiori di zucchero / Cukrowe Kwiaty / Sugar Flowers
- Dolci Vari / Rozne Ciasta / Different Sweets
giovedì 27 dicembre 2012
mercoledì 26 dicembre 2012
giovedì 20 dicembre 2012
sabato 24 novembre 2012
giovedì 22 novembre 2012
sabato 17 novembre 2012
lunedì 8 ottobre 2012
sabato 18 agosto 2012
martedì 7 agosto 2012
venerdì 20 luglio 2012
How To Make Red Hearts Inside The Cake (english version)
In a last few days I saw on this web site a lot of
different cake insert techniques which I liked very much. So I invented my own!
It is very easy and simple, you don’t have to use any complicated tools. I used
this techniques when I made a cake for my husband for our 4th
wedding anniversary, and he was very moved when he saw surprise inside the
cake. I hope you will like it as much as I do!
LIST OF MATERIALS AND TOOLS
·
Rectangular pan for chocolate mud cake. I used 8 ¾’ x
12’ (21 x 30cm)· Two or more empty bean’s can*, the higher the better. I used Ø 2 ¾’ x 4’ (Ø7 x 10cm)
· Little hacksaw for metal.
· Sandpaper
· Sharp knife
· Backing sheets / backing paper
· Chocolate mud cake
· Red velvet or other red color cake
· A lot of white filling. I used cheese cream filling.
HOW TO DO IT
If yours can are smooth just skip out this step.
*CAN PROBLEM
Some people ask me if the cans are food safe to baked in a cake?
Honestly I don't know... But as you can see on the 1st photo inside my bean's can there's only a little white strip of white plastic (?) and any way to protect my cake from can's walls I put inside a baking paper. I guarantee that there wasn't any fumes when cake was baking, there wasn't any chemical odor or any chemical taste of my cake. And after baking the white plastic strip was intact.
I discover that there are many different cans with different interior. Some of them have only one white strip and some of them are cover all over inside with white plastic (?).
Please be careful when you choose the right can to do this cake!
Put round piece of backing paper on the bottom inside each of cans and another one around the walls. Make sure that the paper is much more high than the can. This prevent that cake run out of the can in case it grow up too much (Photo 2).
Bake
chocolate mud cake in rectangular pan and red velvet in bean’s cans. Them let
them cool.
Cut chocolate mud cake in two thin layers.
With sharp knife cut along each of red cylinders in four quarter.
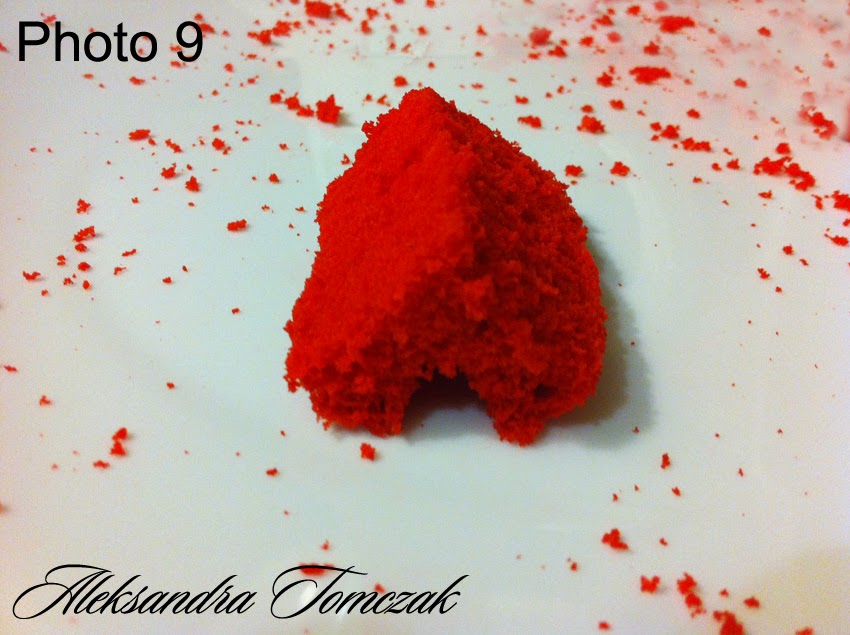
Cut out along each quarter a triangle piece of cake.
When you watch your red cylinder on the top you have to cut it as it show on Photo 6.
Can you see four red hearts?
Put
inside of rectangular backing pan first chocolate mud cake layer with the
smooth surface down.
Put a thin layer of filling.
Put red hearts UP SIDE DOWN on filling and press gently.
Cover with a rest of filling and put on the top the second layer of chocolate mud cake.
Upss! I forgot to make a photo of this two steps…
Cover cake pan with cake board (Photo 11) and put the cake in refrigerator for a few hours.
Take the cake out from the refrigerator and TURN IT UP SIDE DOWN!
Now hearts inside the cake are in the right position!
Cover cake with icing and fondant as you wish and it is done!
This is how the cake looked when I cut it!
mercoledì 18 luglio 2012
martedì 3 luglio 2012
mercoledì 27 giugno 2012
Iscriviti a:
Commenti (Atom)


